Slit-scan photography: painting with time, from a Blender scene to a DIY rotating rig
A build log and a tutorial for slit-scan photography: the one idea behind it, an algorithm I developed at night against Blender renders, two ways to shoot it for real (a train sliding past, a flower spinning on a home-made turntable), and a small side quest where I scraped the SNCF API so I’d stop wasting Saturdays waiting for a TGV.
Introduction🔗
I’ve been a photographer for a long time. What has always pulled me in isn’t a subject so much as a dimension: time. Long exposures, star trails, astrophotography, the whole idea of a single frame that is really a stack of moments. For a few years that love went quiet, though. Between a full day job and a full family, the camera sat in its bag more months than I’d like to admit.
What got me out of the rut was, first, joining a local photo club, the Image Nolféenne in Saint-Nolff, to put some social pressure on myself. It worked. And second, I fell down a rabbit hole that reframed “capturing time” as something I could program, not just wait for. It started with a wonderful write-up on line-scan camera image processing, then this hypnotic wall of line-scan trains, then a classic slit-scan photography post. The one that finally made it click, the best reference by a distance, was Paul Bourke’s page on slit-scan.
So I decided to build my own. This post is the result: what slit-scan is, how I wrote the algorithm at night against a Blender scene (because you can’t summon a train at 2 a.m.), how to run the tool yourself, the two ways I shoot it in the wild, the DIY hardware I had to build for one of them, and a slightly unhinged side quest to make trains show up on schedule. The whole project is open source: github.com/kubeek-art/slitscan.
The guiding principle of the whole thing:
A slit-scan image trades one spatial axis for time. Nothing interesting happens unless something moves; the art is deciding what moves, how fast, and through how narrow a slit.
1. What slit-scan actually is🔗
Take a normal photo. Both axes are space: x and y. A slit-scan image throws one of those axes away and replaces it with time.
Concretely: you take a sequence of frames (a video, or a rendered image sequence), and from each frame you keep only a single thin column of pixels, always at the same place. Then you lay those columns side by side, in order. The output’s vertical axis is still real space (the height of one column), but its horizontal axis is now time: the leftmost column is the first frame, the rightmost is the last.
That’s the entire trick. Everything else is a consequence of it:
- A part of the scene that doesn’t move is sampled through the same slit in every frame, so it smears into a flat horizontal band. Boring backgrounds become stripes.
- A part of the scene that moves through the slit gets “unrolled” over time, column by column. A train passing a fixed slit is reconstructed, nose to tail, into one impossibly long frame.
- Speed becomes geometry. Something moving fast is compressed; something slow is stretched. Change direction and the subject is mirrored or squashed.
You’ve almost certainly seen slit-scan without knowing it. Photo-finish cameras at athletics and horse races are pure slit-scan: a single sensor line reads the finish line continuously, so the x axis of a photo finish is time, which is exactly why two horses can appear at different horizontal positions yet be declared a dead heat. The rolling shutter wobble on a phone camera is accidental slit-scan too, the sensor reads rows at slightly different instants.
There are a couple of axes of choice worth naming up front, because the rest of the post keeps coming back to them:
| Choice | Options | Effect |
|---|---|---|
| Slit orientation | vertical column / horizontal row | column → time runs left-to-right; row → time runs top-to-bottom |
| What moves | the subject (translation), the subject spinning (rotation), or the slit itself | translation unrolls a passer-by; rotation unrolls a 360° turn; a moving slit sweeps a static scene |
For a camera filming something moving perpendicular to its view, Bourke notes the projection you get is “vertical perspective but horizontally orthographic”, the vertical axis behaves like a normal lens, but horizontally there’s no perspective at all, because horizontal is time now. That orthographic-in-x quality is exactly why slit-scan trains look like flawless technical elevations of themselves.
2. The algorithm, and the night-time Blender lab🔗
Here’s the practical problem with slit-scan: your test subject has to move, reproducibly, while you debug. You do not want to be trackside at 2 a.m. re-shooting a TGV every time you fix an off-by-one in a loop. So I did the whole first phase of development against a Blender scene: model something, animate it, render an image sequence, feed that to the algorithm. Ground truth I could re-render on demand, at any speed, in any direction.
I built two scenes, one for each capture mode I cared about: a locomotive that translates past the camera, and a bouquet that rotates on its axis.
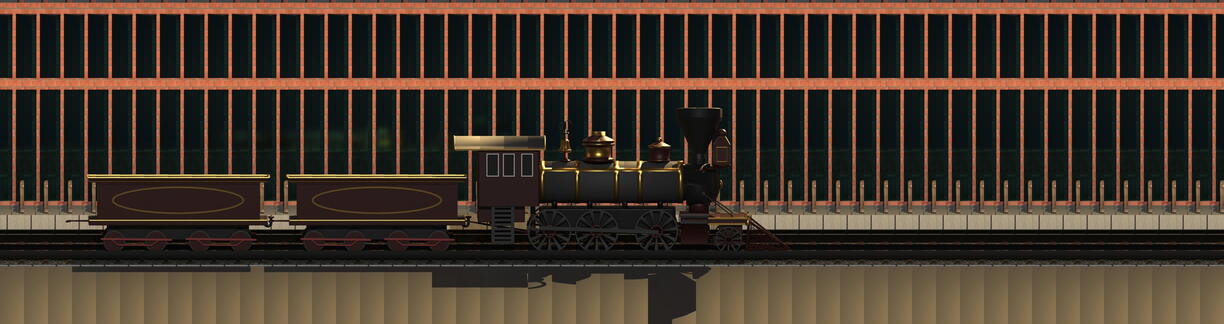
Night-shift ground truth: a Blender locomotive animated past a fixed vertical slit. The repeating fence behind it is a gift for debugging, a periodic background turns into a periodic stripe, so any timing bug is instantly visible.
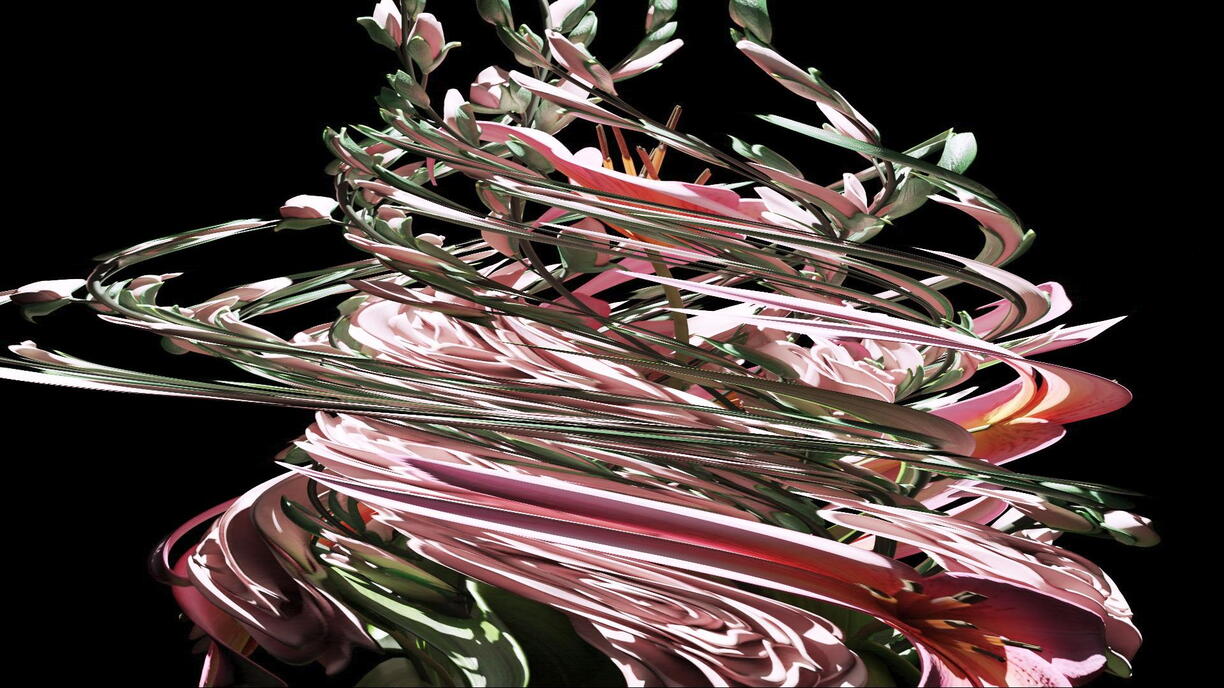
The same idea in rotation: a Blender bouquet spun on its vertical axis, each output column sampled one small angle later, so the flower is unrolled into a 360° ribbon.
The core loop🔗
The algorithm itself is almost embarrassingly small, and that’s the point. It began as a handful of throwaway scripts (tools/slit_vert_1px.py, tools/slit_hor_1px.py…) that each did exactly one thing, then got unified into a single slitscan.py with flags. Load the frames in order, decide which column to sample in each, and copy it into the output at the matching position:
# frames are read in sorted order and sliced to [start:end]
for i, frame in enumerate(frames):
    # where in THIS frame do we sample? (constant, unless a moving slit)
    curr_pos = int(slice_pos + (slice_end - slice_pos) * (i / (num_files - 1)))

    col = frame[:, curr_pos:curr_pos + slice_size]   # a slice_size-wide column

    idx = (j * num_files) + i                          # output column index
    result[:, idx * slice_size:(idx + 1) * slice_size] = col
Four ideas hide in those four lines:
- Orientation. In
verticalmode you take a column (frame[:, pos]) and the output grows wider with each frame. Inhorizontalmode you take a row (frame[pos, :]) and it grows taller. Time runs along whichever axis you’re not sampling. - The moving slit. If
--pos_enddiffers from--pos,curr_poswalks linearly from one to the other across the sequence. Now the slit itself is moving, which is how you scan a completely static scene (more on that in §6). - Slit width (
--size). One pixel is the “pure” slit. Go wider (2, 4, 8 px) and you trade some temporal precision for continuity, at the cost of the sawtooth artefacts Bourke warns about, where a feature ramps across the width of each strip. - Repetition (
--iterations). Thejindex tiles the whole sequence N times across the output, handy for turning a single rotation into a wallpaper of them.
This is what Bourke calls forward mapping: read each frame once, drop its slit into place. It’s simple, fast, and can’t extract anything fancier than an axis-aligned line, which is fine for me. His reverse mapping approach (for each output pixel, go find the best source frame and sub-pixel location) is what you’d reach for if you wanted diagonal or curved sampling paths with antialiasing. A project for another set of nights.
Averaging: the same frames, a different question🔗
Once you’re already holding a stack of aligned frames, slit-scan is only one thing you can ask of them. Its cousin average.py collapses the whole stack per pixel with mean, median, min or max: mean gives you a smooth long-exposure; median quietly deletes anything that moves (tourists vanish from a monument); max is a poor man’s star-trail / light-painting compositor; min keeps the darkest value seen. Same raw material, orthogonal effect.
3. Running it yourself: from a video to a slit-scan🔗
The tool is a small Python project (OpenCV + NumPy). Enough of a tutorial to reproduce everything above.
Setup🔗
git clone https://github.com/kubeek-art/slitscan
cd slitscan

# either plain pip…
pip install opencv-python numpy
# …or, since it's a uv workspace:
uv sync
Step 1 — turn footage into frames🔗
Slit-scan eats an ordered directory of images, not a video. The bundled extractor unpacks any clip into a timestamped folder of frames:
python3 video/convert2img.py path/to/clip.mp4 --output_root video/outputNote. Sampling is one column per frame, so temporal resolution is capped by frame rate. That’s the whole reason I shoot subjects at 60 fps (see §4): a fast train sampled at 30 fps gives you a stubby, aliased result, because you simply don’t have enough columns to unroll it smoothly.
Step 2 — make the slit-scan🔗
The default just samples the centre column of every frame:
# vertical slit at the centre, 1 px wide, whole sequence
python3 slitscan.py video/output/<your-frames>
The knobs that matter:
| Flag | Default | What it does |
|---|---|---|
--mode | vertical | vertical (sample a column) or horizontal (sample a row) |
--pos | centre | which column/row to sample |
--pos_end | = --pos | if set, the slit moves from --pos to --pos_end across the run |
--size | 1 | slit thickness in pixels |
--start / --end | full range | trim the frame range |
--reverse | off | play the sequence backwards (flips the subject’s direction) |
--iterations | 1 | tile the whole sequence N times |
--output_dir | outputs | where to write the result |
A few recipes:
# a horizontal slit-scan, chunky 5px strips, sequence tiled twice
python3 slitscan.py frames/ --mode horizontal --size 5 --iterations 2

# sweep the slit clear across a 1920px-wide static scene
python3 slitscan.py frames/ --pos 0 --pos_end 1920

# and the averaging cousin: delete everything that moved
python3 average.py frames/ --mode median
That’s the entire deterministic core. Everything remaining in this post is about feeding it well, which turns out to be where the real work is.
4. Mode one — translation: catching a TGV🔗
The classic slit-scan. Camera locked on a tripod, slit fixed, subject moves across the frame. The train sliding past the slit is what gets unrolled; the fixed landscape behind it collapses into bands.

A whole TGV unrolled into a single frame. The flat blur above and below is the static background, sampled through the same slit for the entire pass; only the train, actually moving through the slit, resolves into detail. Horizontally there is no perspective at all, that axis is pure time.
The subtlety is timing. A slit-scan of a moving subject only looks “correct” (undistorted aspect ratio) when the subject’s speed matches your sampling. From the field notes in the repo: at ~110 km/h a train covers 30.5 m/s, so a 200 m train clears a point in about 6.5 s. At 60 fps that’s ~390 frames, ~390 columns to rebuild the train from. Too slow a frame rate and it’s compressed and aliased; a train that speeds up or slows down through the pass literally stretches and squeezes in the output. Direction matters too: shoot it going the “wrong” way (or add --reverse) and the locomotive comes out at the tail.
My shooting config for trains, which is really just “give the algorithm the cleanest, fastest-sampled footage you can”:
Mode:          Full HD video, 60 fps
Shutter:       1/500 – 1/1000 s   (freeze each column; no motion blur within a slit)
ISO:           auto, or a low fixed value
Focus:         MANUAL — critical; autofocus will hunt as the train enters
Stabilisation: OFF (it's on a tripod; IS would fight you and drift the slit)
Manual focus is the one people forget. Autofocus re-racks the instant the train breaks the frame, and a slit that changes focus mid-pass ruins the whole strip.
5. Mode two — rotation: a DIY motorised turntable🔗
The other mode keeps the subject in place and spins it. Instead of unrolling a passer-by, you unroll a full turn: each output column is the same object photographed one small angle later, so a 360° rotation becomes a continuous ribbon. This is where the flower images come from, that taffy-pulled, liquid look is a real bouquet rotating past the slit.

Rotation slit-scan of a real bouquet on the turntable. Petals smear into ribbons of cream and wine-red as the flower turns past the slit; the vertical banding at the right edge is the (nearly static) background giving itself away.
But rotation has a hard requirement translation doesn’t: constant angular speed. Spin the flower by hand and every wobble in your wrist becomes a distortion in the output. So I had to improve my rig and use video instead.
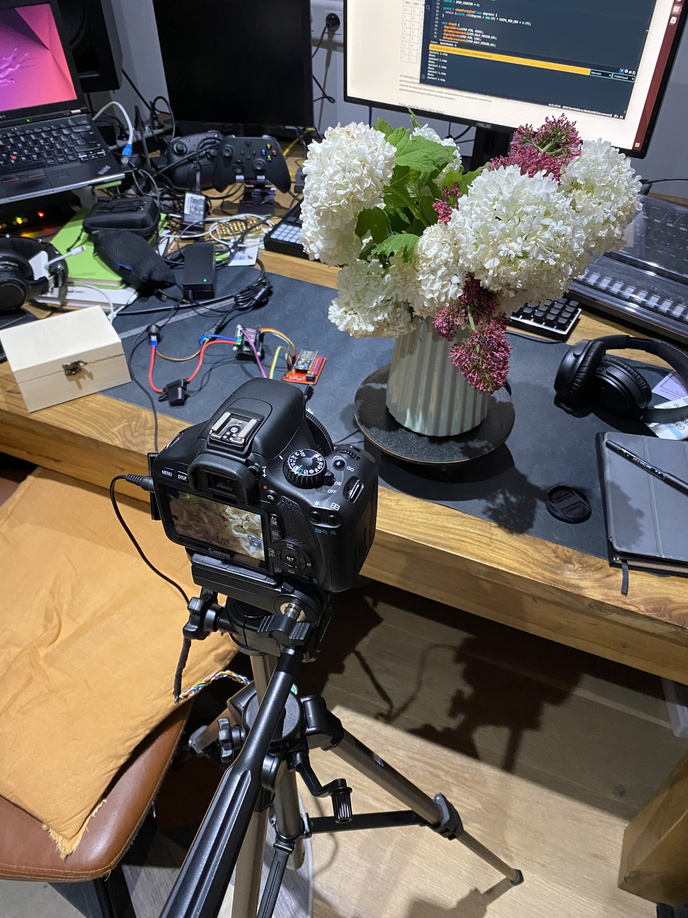
The DIY turntable: a Canon DSLR on a tripod facing a bouquet on a motorised platter, an ESP32 + DRV8825 + stepper on the breadboard, driver code on the monitor. All of it exists to give rotation the one thing it needs, a steady, repeatable angular velocity.
The electronics🔗
Nothing exotic, a stepper for repeatable motion, a driver, a 3.3 V brain, and a relay to fire the shutter. Full details, sketches and wiring photos live in the hardware/ folder; the short version:
| Part | Choice | Notes |
|---|---|---|
| Motor | NEMA17-format stepper (Y09-43D1-0040) | 1.8°/step → 200 steps/rev; ~2.7 Ω/phase, ~1–1.5 A/phase |
| Driver | DRV8825 | microstepping to 1/32 for smooth, quiet motion |
| Controller | ESP32 DevKit V1 | 3.3 V logic, plenty of GPIO, drives the DRV8825 directly |
| Shutter | 5 V relay module | wired across the camera’s remote-shutter contacts |
The ESP32 steps the motor by a fixed micro-angle, then pulses the relay across the camera’s remote-release contacts, so rotation and capture stay in lockstep: one frame per angular increment, forever consistent. (You can also just let it turn slowly and record video, exactly like the train.) The GPIO map I settled on: STEP=25, DIR=26, EN=27, MS1/2/3=14/33/32, and the shutter relay on GPIO13 powered from a separate 5 V rail, not the ESP32’s regulator.
Watch out, this is where you fry a driver. The DRV8825’s current limit is set by a tiny trim-pot:
Vref = Imax / 2(so 0.5 V ≈ 1 A). Set it with a ceramic screwdriver, logic powered but motor supply off, then apply VMOT. And the sequencing rule I learned the nervous way: power VMOT before logic, cut logic before VMOT, and never unplug the motor while VMOT is live. The back-EMF from a disconnected coil punches straight through the DRV8825’s H-bridge MOSFETs. A 100 µF cap across VMOT is not optional.
The DRV8825’s 1/32 microstepping is what makes the difference between a flower that flows and one that visibly stutters every 1.8°, at full steps you can count the teeth of the motor in the petals.
6. Other experiments: moving the slit instead of the subject🔗
The two modes above move the subject. But the algorithm’s --pos → --pos_end also lets you hold the subject still and move the slit across a scene. Two more experiments pushed on that, and together they teach the single most important lesson about slit-scan.

A regional TER unrolled against the countryside. With a genuinely static background, every row becomes one slit-pixel smeared across the whole width, which is why the fields dissolve into clean horizontal stripes while the moving train stays sharp.
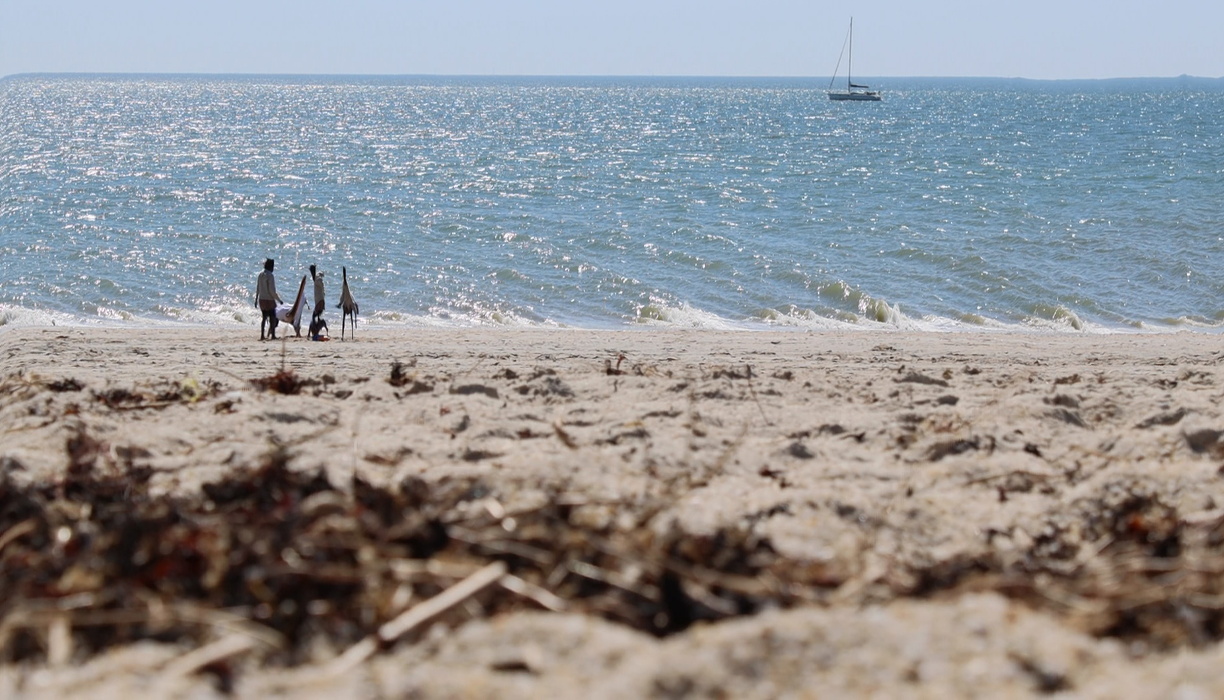
A near-static seascape: only the waves and the shimmer move. Because almost nothing shifts through the slit, the result stays close to an ordinary photo, betraying itself only in the faint horizontal banding on the water. Proof that with no relative motion, slit-scan gives you back a normal image.
That’s the lesson, side by side. Slit-scan is entirely about relative motion: the train against still fields turns surreal, while the still beach against a still slit comes back almost ordinary. If nothing crosses the slit, there’s nothing to unroll, and the “magic” is just your frame rate faithfully reprinting the same scene. Decide what moves before you press record; the algorithm can’t add motion that wasn’t there.
7. The side quest: scraping the SNCF so trains show up on schedule🔗
Here’s the honest constraint again: I don’t have time to stand trackside guessing. And my nearest good spot from where I live is by Saint-Nolff, which has no station, it sits on the Rennes–Vannes line between Vannes and Questembert, around km 106 of the corridor. So there’s no timetable that says “a train passes here at this time.” I had to compute it.
So I wrote sncf.py. It hits the SNCF Navitia API (api.sncf.com/v1/coverage/sncf, key in a .env), pulls the day’s departures from the five anchor stations up and down the line (Lorient, Vannes, Questembert, Redon, Rennes), and for each one follows its vehicle_journeys to get the full stop sequence. A train counts as passing Saint-Nolff if its journey has stops on both sides of km 106, which catches the fast services that skip every small station. Then it estimates the actual passage time by linear interpolation on distance between the two flanking stops:
sn_min = m_dep + fraction × (m_arr − m_dep)For good measure it folds in weather from the Open-Meteo API (bucketed into Nuit / Matin / Après-midi / Soir), because a beautiful slit-scan of a train in flat grey light isn’t worth the trip, and caches everything under cache/ to be kind to the API.
The output is the part that made me grin. Besides a JSON file and a terminal table, it renders a weekly chart that is itself shaped like a slit-scan: hours 0–24 across the x-axis, the seven days stacked up the y-axis, each train a coloured vertical line (orange eastbound, cyan westbound), with weather bands underneath.
$ python sncf.py
# → saint_nolff_YYYYMMDD.json
# → slitscan_saint_nolff.png   (x = hour of day, y = day of week)
Time on one axis, repeated sampling on the other, colour-coded by direction. I set out to catch trains with a slit-scan and accidentally drew a slit-scan of the trains. Which felt like the right note to end the project on.
Summary🔗
| Step | What it does | How you verify it |
|---|---|---|
| Concept (§1) | one spatial axis → time; only relative motion matters | photo-finish / rolling-shutter behave the same way |
| Algorithm (§2) | forward-map one slit per frame into an output column | Blender ground truth: periodic background → periodic stripe |
| Tutorial (§3) | convert2img.py → slitscan.py with --mode/--pos/--pos_end/--size | run on a clip; strip count = frame count |
| Translation (§4) | fixed slit, subject passes; unroll a whole train | 60 fps, 1/500–1/1000, manual focus → undistorted, sharp strip |
| Rotation (§5) | subject spins on a DIY ESP32 + DRV8825 turntable | constant angular speed → petals flow, don’t stutter |
| Static scene (§6) | move the slit, not the subject | still beach ≈ normal photo; still fields → clean stripes |
| Side quest (§7) | scrape Navitia to predict passages at Saint-Nolff | the weekly chart is itself a slit-scan of the timetable |
The five things to remember: trade a spatial axis for time; nothing happens without relative motion; sample as fast as you can (frame rate is your horizontal resolution); rotation demands constant angular speed, hence the rig; and respect the DRV8825’s power sequencing unless you enjoy buying driver boards.
If you liked it, I shareed more images in my art book at art.kubeek.com
This is a hobby project built on stolen evenings, rough edges everywhere, no antialiasing, forward-mapping only, a breadboard held together by optimism. But it did exactly what I hoped: it put a camera back in my hands and made “capturing time” something I could build instead of just wait for. The code, the hardware notes and the Blender workflow are all in the repo if you want to make your own.1
-
Standing on the shoulders of others: Paul Bourke’s slit-scan reference is the canonical explanation, and the line-scan trains gallery is what turned the idea from “neat” into “I have to try this”. ↩